Installation manual UuZ Cylinders
UZ CYLINDERS

-
CX 2122 – Electronic knob cylinder, knob module as a double knob cylinder with electronic authorization on one side
-
CX 2124 – Electronic double knob cylinder, knob module as double knob cylinder with separate electronic authorization on both sides
-
CX 2126 – Electronic half cylinder, knob module as half cylinder with electronic authorization
Required tools & accessories
- Uhlmann & Zacher cylinder in original packaging
- Uhlmann & Zacher Servicekey card
- Optional: Uhlmann & Zacher battery replacement and dismantling card
- Optional: Uhlmann & Zacher battery changing tool for knob modules and cylinders CX212x
- BlueID Lock Admin App, including tenant name, user name and password
- BlueID ACaaS Web GUI, including tenant name, user name and password
- Phillips screwdriver for M5
- Lockpicking tool or a sharp, flat awl
Mechanical installation
The technical data on dimensions, power supply, operating temperature, installation location and more can be found in the respective product data sheet.
CX 2122 Data sheet
CX 2124 Data sheet
CX 2126 Data sheet
Operating and installation instructions, version: 1.03
1. Observe the manufacturer's instructions for intended and improper use as well as the general safety instructions.
Operating and installation instructions, “2 Security”, p. 4
2. Familiarize yourself with the structure and scope of delivery of the cylinder.
Operating and installation instructions, “3.2 Structure and scope of delivery”, p. 6f
3. Observe the manufacturer's general assembly instructions.
Operating and installation instructions, “4.1.1 General assembly instructions”, p. 11
4. Remove the battery tab from the electronic knob module.
Operating and installation instructions, “4.1.2 Remove the battery flag”, p. 11
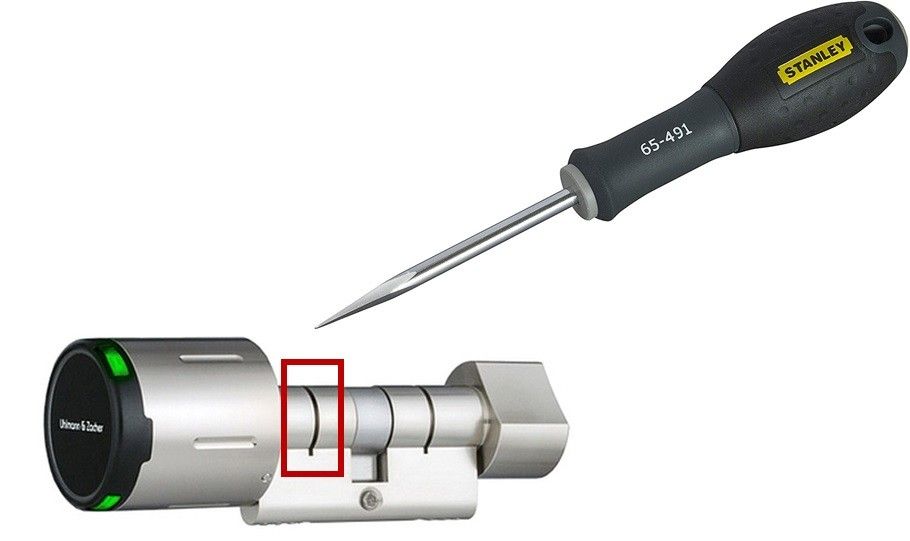
5. Remove the electronic knob module using a lock picking tool or a flat, pointed awl. To do this, slide the tip of the unlocking aid into the cylinder along the axis on the inside. You will feel a slight pressure from the spring. Keep the spring pressed and pull the knob module out gently until it can be removed from the cylinder. The electronic knob module can only be dismantled in one position.
6. Mount the cylinder housing in the lock and then the electronic knob module on the cylinder housing.
Operating and installation instructions, “4.2 Assembly”, p. 12
Installation and set up
-
Get acquainted to the Uhlmann & Zacher Servicekey card.
Operating and installation instructions, “5.1 Teaching in the service key”, p. 13 -
Optional: Learn the Uhlmann & Zacher battery replacement and dismantling card.
Operating and installation instructions, “5.2.1 Teaching in the battery replacement and disassembly card”, p. 13 -
Set the time with the help of the BlueID Lock Admin App.
-
Create a new lock in the ACCESS Web GUI.
-
After the lock has now been created in the Access GUI, the cylinder is now assigned with the Lock Admin App.
-
Test the functionality with the help of the Lock Admin App.
Maintenance
- Battery change*: In the Lock Admin App, click on the “Maintenance” button and then in the maintenance menu on “Change battery” to retract the locking pins of the knob cover. Then remove the knob cover using the battery changing tool.
This is also explained in the Uhlman & Zacher Manual: “7.2.1 Changing the battery”, p. 18f -
To ensure proper function, please always use batteries according to the manufacturer's specifications. Batteries other than those prescribed by the manufacturer can lead to unexpected voltage drops and malfunctions despite the same specification.